 have long been thought of as a next-generation shared hosting solution.
They use virtualization ‘tricks’ to let you coin your own hosting environment and be a master of your server at a pretty affordable price.
If you are well-versed in server administration, then an unmanaged VPS will help you make the most of your virtual machine’s capabilities.
However, are you well-versed enough in security as well?
Here is a Linux VPS security checklist, which comes courtesy of our Admin Department.
What exactly is an unmanaged VPS?
Before we move to the security checklist, let’s find out exactly what an unmanaged VPS is and what benefits it can bring to you.
With an unmanaged VPS, pretty much everything will be your responsibility.
Once the initial setup is complete, you will have to take care of server maintenance procedures, OS updates, software installations, etc. Data backups should be within your circle of competence as well.
This means that you will need to have a thorough knowledge of the Linux OS. What’s more, you will have to handle any and all resource usage, software configuration and server performance issues.
Your host will only look into network- and hardware-related problems.
Why an unmanaged VPS?
The key advantages of unmanaged VPSs over managed VPSs are as follows:
you will have full administrative power and no one else will be able to access your information;you will have full control over the bandwidth, storage space and memory usage;you will be able to customize the server to your needs specifically;you will be able to install any software you want;you will save some money on server management – it really isn’t that hard to set up and secure a server if you apply yourself and updating packages is very easy;you will be able to manage your server in a cost-efficient way without the need to buy the physical machine itself (you would have to if you had a dedicated server);
Unmanaged VPS – security checklist
With an unmanaged VPS, you will need to take care of your sensitive personal data.
Here is a list of the security measures that our administrators think are key to ensuring your server’s and your data’s health:
1. Use a strong password
Choosing a strong password is critical to securing your server. With a good password, you can minimize your exposure to brute-force attacks. Security specialists recommend that your password be at least 10 characters long.
Plus, it should contain a mix of lower and uppercase letters, numbers and special characters and should not include common words or personally identifiable information. You are strongly advised to use a unique password so as to avoid a compromised service-connected breakthrough.
A strong password may consist of phrases, acronyms, nicknames, shortcuts and even emoticons. Examples include:
1tsrAIn1NGcts&DGS!:-) (It’s raining cats and dogs!)
humTdumt$@t0nAwa11:-0 (Humpty Dumpty sat on a wall)
p@$$GOandCLCt$500 :-> (Pass Go and collect $500)
2. Change the default SSH port
Modifying the default SSH port is a must-do security measure.
You can do that in a few quick steps:
Connect to your server using SSHSwitch to the root userRun the following command: vi /etc/ssh/sshd_configLocate the following line: # Port 22Remove # and replace 22 with another port numberRestart the sshd service by running the following command: service sshd restart
3. Disable the root user login
The root user has unlimited privileges and can execute any command – even one that could accidentally open a backdoor that allows for unsolicited activities.
To prevent unauthorized root-level access to your server, you should disable the root user login and use a limited admin account instead.
Here is how you can add a new admin user that can log into the server as root via SSH:
Create the user by replacing example_user with your desired username (in our case – ‘admin’):
adduser adminSet the password for the admin user account:
passwd adminTo get admin privileges, use the following command:
echo 'admin ALL=(ALL) ALL' >> /etc/sudoersDisconnect and log back in as the new user:
ssh admin@my.ip.or.hostnameOnce you are logged in, switch to the root user using the ‘su’ command:
su
password:
whoami
rootTo disable the root user login, edit the /etc/ssh/sshd_config file. You will only need to change this line:
#PermitRootLogin yes to:
PermitRootLogin no
You will now be able to connect to your server via SSH using your new admin user account.
4. Use a rootkit scanner
Use a tool like rkhunter (Rootkit Hunter) to scan the entire server for rootkits, backdoors and eventual local exploits on a daily basis; you’ll get reports via email;
5. Disable compilers for non-root users (for cPanel users)
Disabling compilers will help protect against many exploits and will add an extra layer of security.
From the WebHost Manager, you can deny compiler access to unprivileged (non-root) users with a click.
Just go to Security Center ->Compiler Access and then click on the Disable Compilers link:
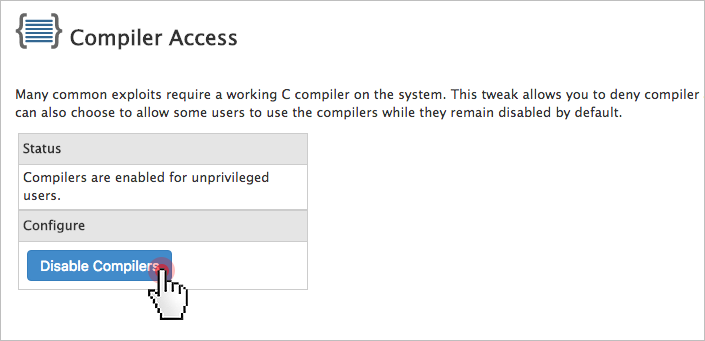
Alternatively, you can keep compilers for selected users only.
6. Set up a server firewall
An IPTABLES-based server firewall like CSF (ConfigServer Firewall) allows you to block public access to a given service.
You can permit connections only to the ports that will be used by the FTP, IMAP, POP3 and SMTP protocols, for example.
CSF offers an advanced, yet easy-to-use interface for managing your firewall settings.

Here is a good tutorial on how you can install and set up CSF.
Once you’ve got CSF up and running, make sure you consult the community forums for advice on which rules or ready-made firewall configurations you should implement.
Keep in mind that most OSs come with a default firewall solution. You will need to disable it if you wish to take advantage of CSF.
7. Set up intrusion prevention
An intrusion prevention software framework like Fail2Ban will protect your server from brute-force attacks. It scans logfiles and bans IPs that have unsuccessfully tried to log in too many times.

Here’s a good article on how to install and set up Fail2Ban on different Linux distributions.
You can also keep an eye on the Google+ Fail2Ban Users Community.
8. Enable real-time application security monitoring
Тhe best real-time web application monitoring and access control solution on the market – ModSecurity, allows you to gain HTTP(S) traffic visibility and to implement advanced protections.
ModSecurity is available in your Linux distribution’s repository, so installing it is very easy:
apt-get install libapache2-modsecurity
Here’s a quick guide on how to install and configure ModSecurity.
Once you’ve got ModSecurity up and running, you can download a rule set like CRS (OWASP ModSecurity Core Rule Set). This way you won’t have to enter the rules by yourself.
9. Set up anti-virus protection
One of the most reliable anti-virus engines is ClamAV – an open-source solution for detecting Trojans, viruses, malware & other malicious threats. The scanning reports will be sent to your email address.
ClamAV is available as a free cPanelplugin.
You can enable it from the Manage Plugins section of your WHM:
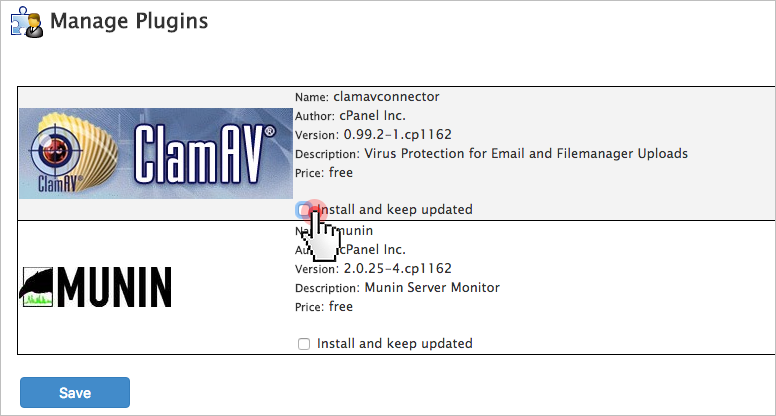
Just tick the ‘Install ClamAV and keep updated’ checkbox and press the ‘Save’ button.
10. Enable server monitoring
For effective protection against DDoS attacks, make sure you install a logfile scanner such as logcheck or logwatch. It will parse through your system logs and identify any unauthorized access to your server.
Use software like Nagios or Monitis to run automatic service checks to make sure that you do not run out of disk space or bandwidth or that your certificates do not expire.

With a service like Uptime Doctor or Pingdom, you can get real-time notifications when your sites go down and thus minimize accidental downtime.
11. Run data backups
Make regular off-site backups to avoid the risk of losing data through accidental deletion.
You can place your trust in a third-party service like R1Soft or Acronis, or you can build your own simple backup solution using Google Cloud Storage and the gsutil tool.
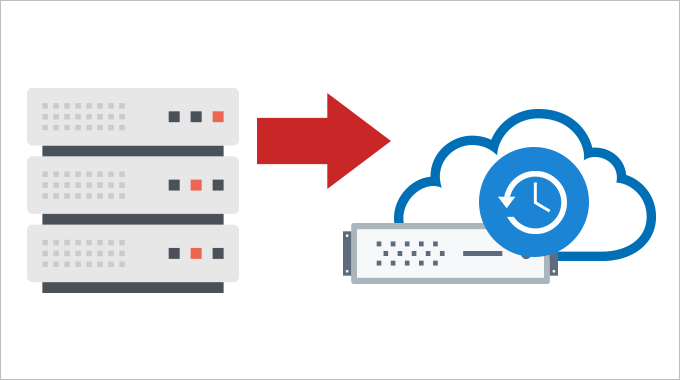
If you are on a tight budget, you can keep your backups on your local computer.
12. Keep your software up to date
Keeping your software up to date is the single biggest security precaution you can take.
Software updates range from regular minor bug fixes to critical vulnerability patches. You can set automatic updates to save time.
However, keep in mind that automatic updates do not apply to self-compiled applications. It’s advisable to first install an update in a test environment so as to see its effect before deploying it to your live production environment.
Depending on your particular OS, you can use:
yum-cron (for CentOS)unattended upgrades (for Debian and Ubuntu)dnf-automatic (Fedora)
If you have not obtained an unmanaged VPS yet, you could consider our solutions:
OpenVZ VPS packages – all setups from 4 to 10 are unmanaged and come with SSH/full root access (for cPanel setups only) and with a CentOS/Debian/Ubuntu OS installation;KVM VPS setups – all four setups are unmanaged and offer SSH/full root access; OS options include CentOS/Debian/Ubuntu as well as a few OS ISO alternatives like Fedora and FreeBSD;
Comments